The Best Way to Secure a Surfboard to a Roof Rack
A guide to securing surfboards on a roof rack or truck bed using retractable ratchet straps.
(Updated for 2025: check out our Outdoor Tie-Down Collection for surfboard-ready straps.)

Picture this: You’re cruising down the highway, windows down, salt air filling your lungs, then suddenly… you hear a thud followed by a horrified gasp from your passenger. Your board just took a solo flight.
Nothing kills the stoke faster than watching your surfboard wobble in the wind, or worse, seeing it fly off your roof on the highway. Whether you are chasing dawn patrol waves or heading out for a weekend surf trip, securing your board properly is just as important as picking the perfect wave.
That’s where retractable ratchet straps come in. These often-overlooked tools can mean the difference between a smooth ride to the beach and a stressful roadside rescue mission. In this guide, we are gonna break down the best ways to strap down your surfboard whether on a roof rack, a truck bed, or soft racks, so that you can finally focus on what really matters: catching waves and having fun. Let’s “dive” in!
Need more guides on tying town your outdoor gear? Read more: Ultimate Guide to Securing Vehicles & Outdoor Gear with Retractable Ratchet Straps
What You Need to Strap a Surfboard to a Roof Rack
Before you chase the perfect wave, make sure your surfboard is locked in and ready to ride on your car, and not flying off it! A solid setup keeps your board secure, prevents annoying wind noise, and makes sure you won’t be that person pulling over to rescue a board from the middle of the road. Yep, who wants to be THAT person? Anyway, here’s what you are gonna need to keep your board safe and sound on the journey to the beach:
1. Surfboard Tie Down Straps
A loose surfboard on your roof is basically a disaster waiting to happen. We all want a safe ride when cruising down the coast or racing to catch the morning swell, and a solid set of surfboard tie down straps is literally the key to getting your board to the beach safely without any mid-drive freakouts.
✔ Durability Matters
You wouldn’t trust a cheap leash to hold up in big waves, so why settle for weak straps? Trust me, go for weather-resistant nylon or polyester webbing that can handle highway speeds, strong winds, and saltwater exposure, it will last longer than a regular strap.
Quick pick: Need marine-grade retractables rated for salt air and salt water? Check out our Blue 1-in x 12 ft Surfboard Strap Set: engineered for 500 lb WLL and backed by our patented auto-retract technology.
✔ Ease of Use
The last thing you want is to wrestle with a super complicated strap system in the parking lot. Look for straps with easy-to-use ratchet mechanisms that tighten and release smoothly. Simple- no over-tightening, no stress.
✔ Padding for Protection
Ever notice those annoying little dings and dents on your board? That is exactly what happens when straps rub against your deck. Premium tie down straps with neoprene or rubber padding around the buckles will keep your board scratch-free.
✔ Length Considerations
Straps come in sizes ranging from 8 to 15 feet. If you are stacking multiple boards or hauling a longboard, go for the longer option. You’ll thank yourself later.
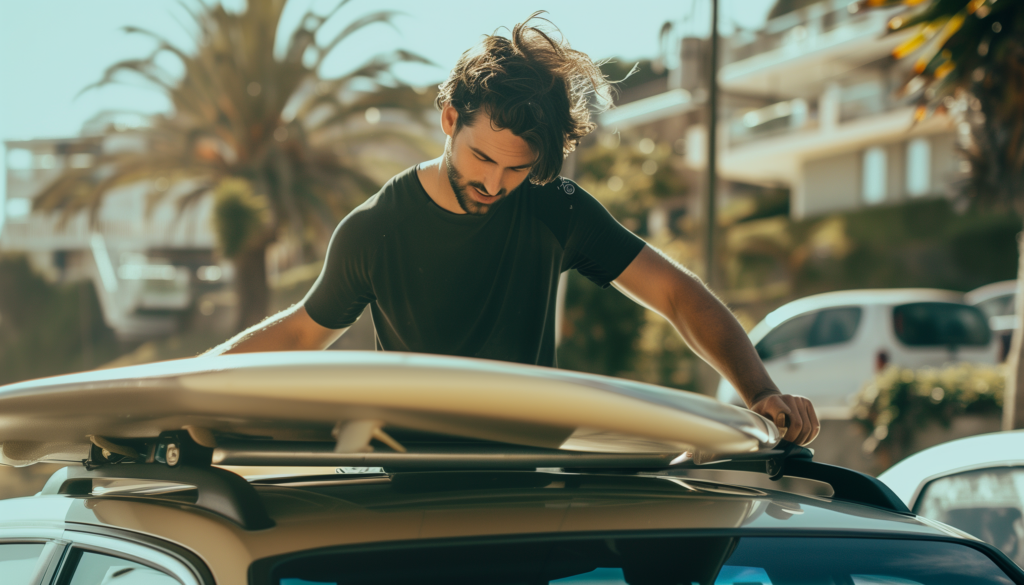
2. Surfboard Roof Rack vs. Surfboard Car Rack
While both terms are often used interchangeably, there’s a slight difference between a surfboard roof rack and a surfboard car rack:
| Feature | Surfboard Roof Rack | Surfboard Car Rack |
|---|---|---|
| Definition | A set of crossbars mounted on the roof of your car, used for carrying various cargo, including surfboards. | A dedicated surfboard-carrying system designed specifically to transport surfboards safely on a car. |
| Best For | Cars that already have factory-installed or aftermarket crossbars. | Cars without built-in roof racks or those needing a soft rack solution. |
| Pros | More secure, designed for multiple sports equipment (bikes, kayaks, etc.), often lockable. | Portable, easy to install and remove, doesn’t require permanent crossbars. |
| Cons | Requires crossbars, higher cost, semi-permanent installation. | May not be as secure at high speeds, straps can damage paint if not used properly. |
If your car already has crossbars, a surfboard roof rack (like Thule or Yakima systems) provides the most secure way to transport your board. If you don’t have a built-in rack, a surfboard car rack (such as soft racks) is a great alternative.
3. Alternative Options: Surfboard Straps for Cars Without a Roof Rack
If your vehicle doesn’t have a built-in roof rack, don’t worry. You can still safely transport your surfboard using alternative methods:
Soft Racks
- Soft racks consist of foam or inflatable pads that sit on your car’s roof with built-in surfboard tie down straps to secure the board.
- These racks are easy to install and remove, making them ideal for renters or those who don’t want permanent crossbars.
- They work with most vehicle types, from sedans to SUVs.
DIY Methods (Temporary Solutions)
If you don’t have soft racks, you can use:
- Pool noodles or foam pipe insulation to create a cushioned barrier between your car roof and the surfboard.
- Ratchet straps or bungee cords to tie the board down. However, avoid over-tightening to prevent damage to your surfboard.
- Yoga mats or towels placed under the board to prevent scratches on your car roof.
FYI, while these DIY solutions can still work in tying things down, they are not as secure as proper surfboard straps for car travel. If you transport your board frequently, investing in high-quality soft racks or a dedicated surfboard roof rack is highly recommended.
Step-by-Step Guide to Strapping a Surfboard
With the right setup and a few simple steps, you’ll have your board strapped in tight and ready for the ride. Here’s how to do it right:
Step 1: Get Your Gear Ready
Before you start strapping, make sure you have:
✔ At least 2 retractable ratchet straps – One for the front, one for the back.
✔ A roof rack or truck bed – Because throwing your board in the backseat just isn’t an option.
✔ Surfboard bags or padding (optional, but highly recommended) – Extra protection never hurts!
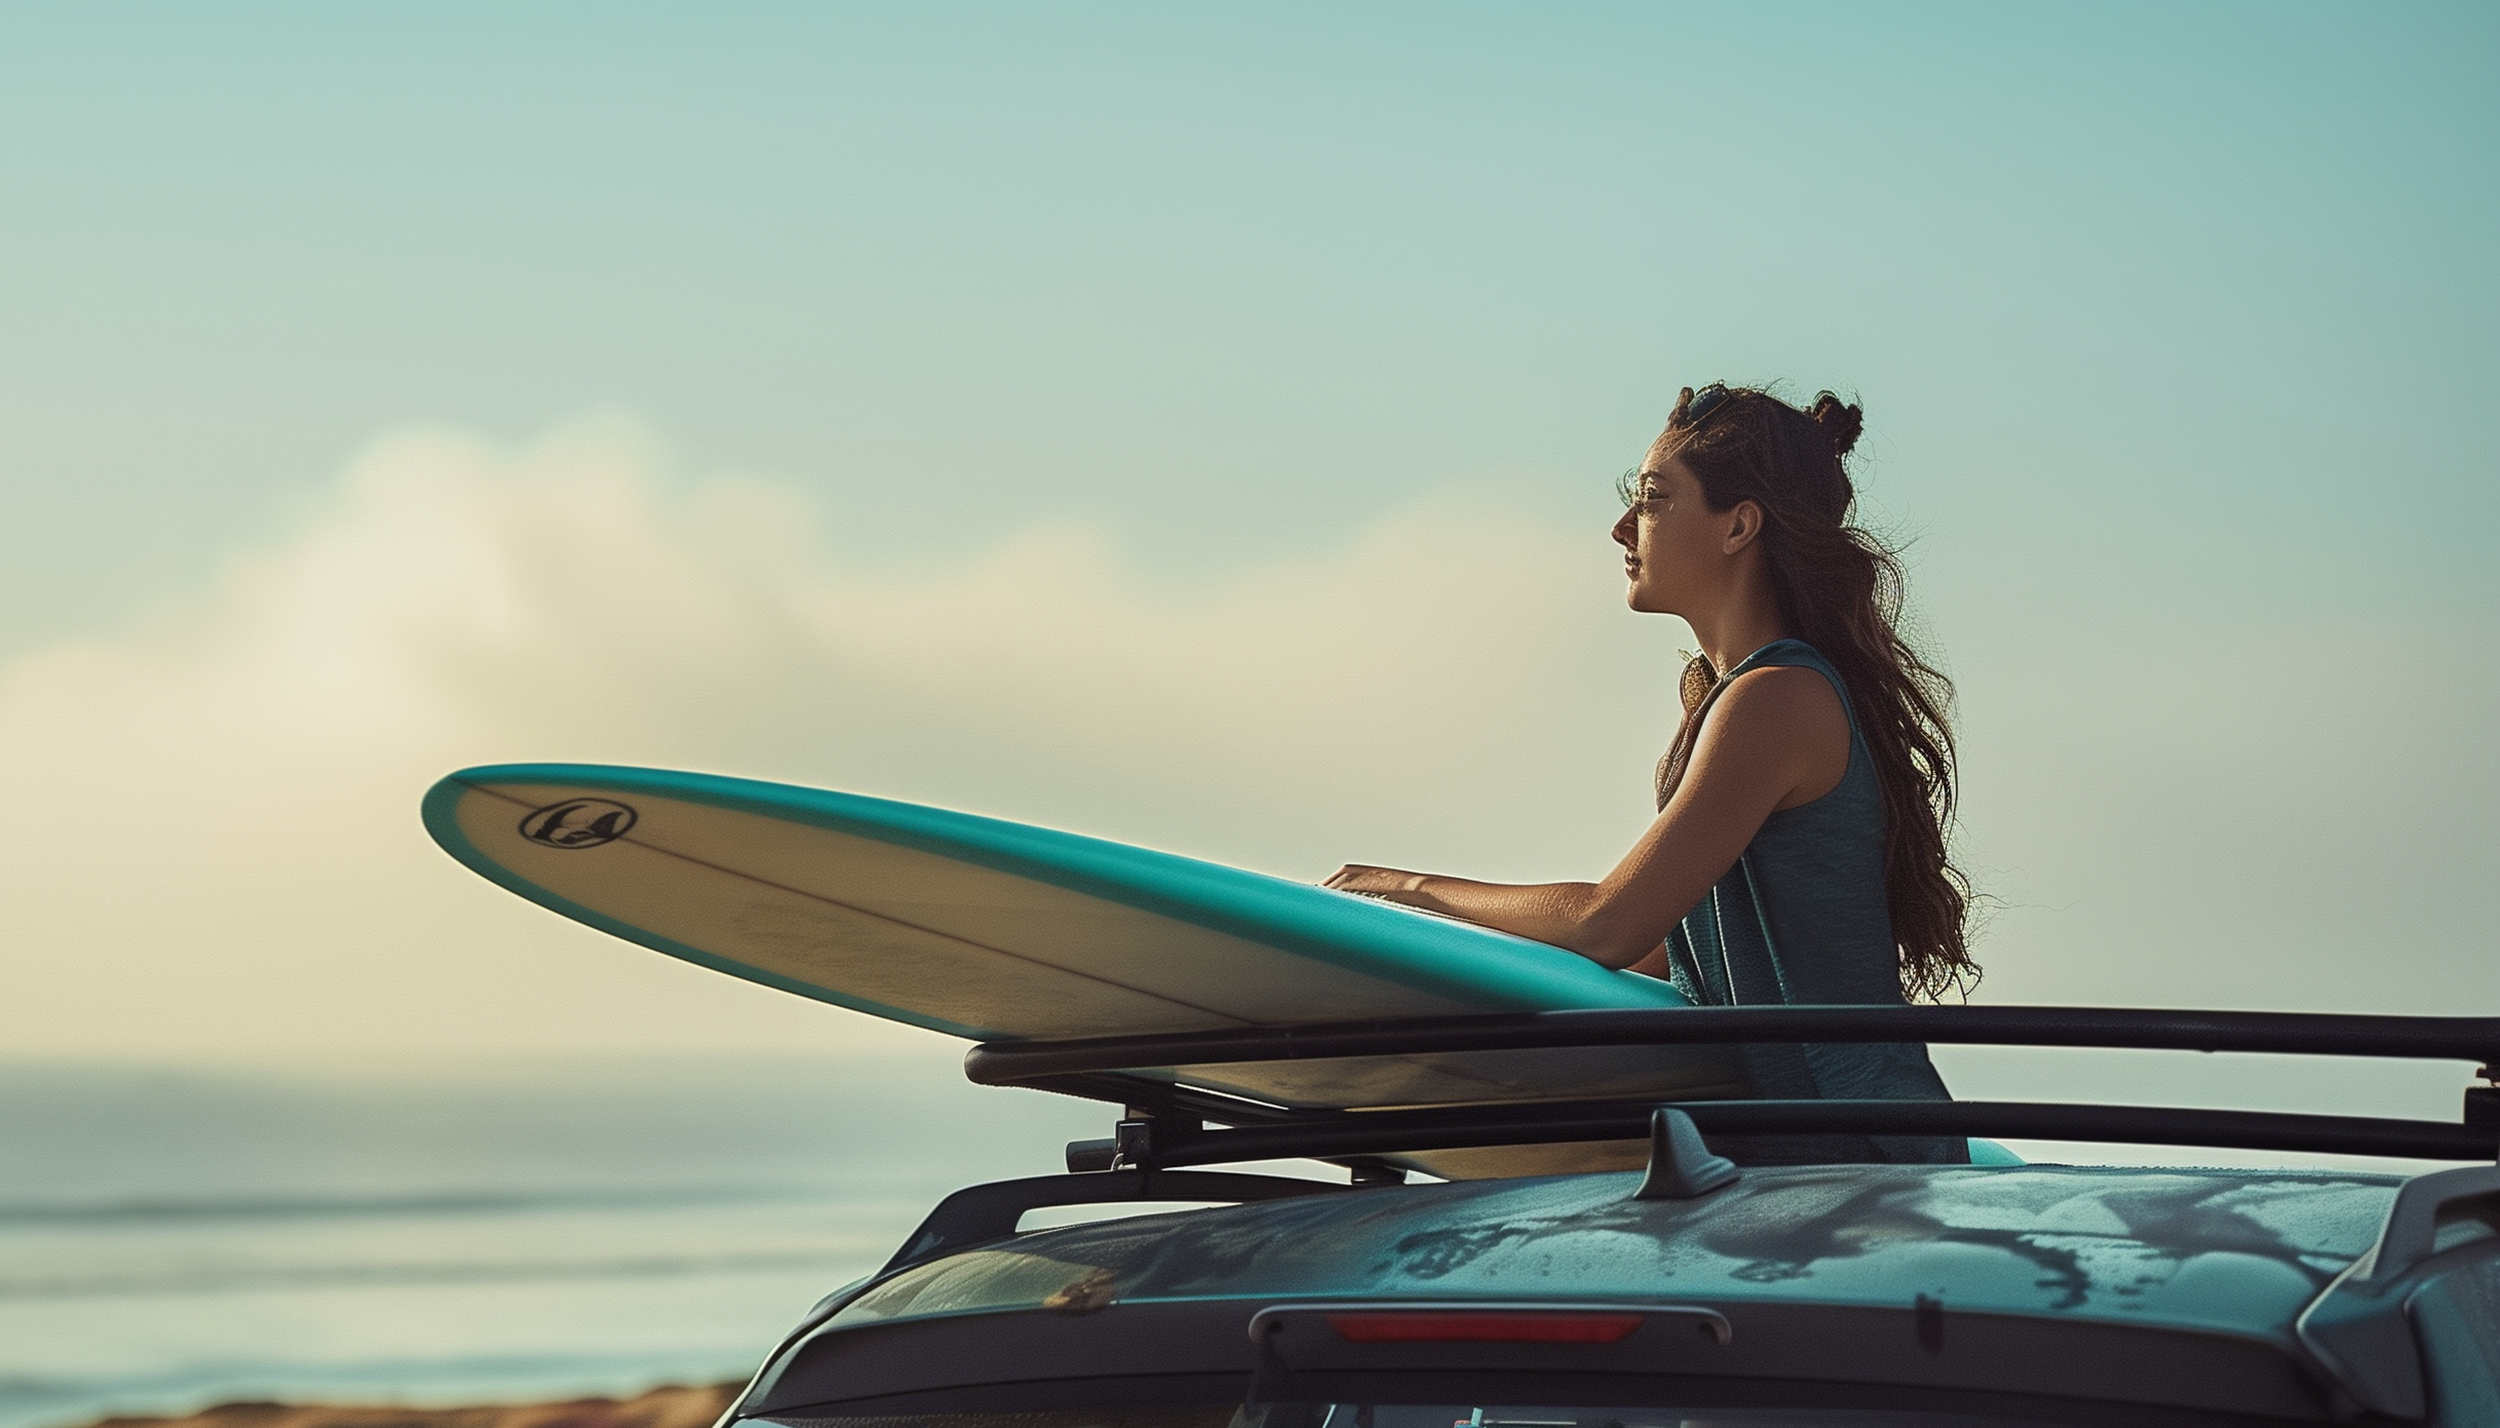
Step 2: Positioning Your Surfboard
If you’re using a roof rack:
- Make sure to face the nose forward and the fin facing up.
- Lay the boards deck-side down to minimize wind resistance.
- Keep them parallel to the car for balanced weight distribution.
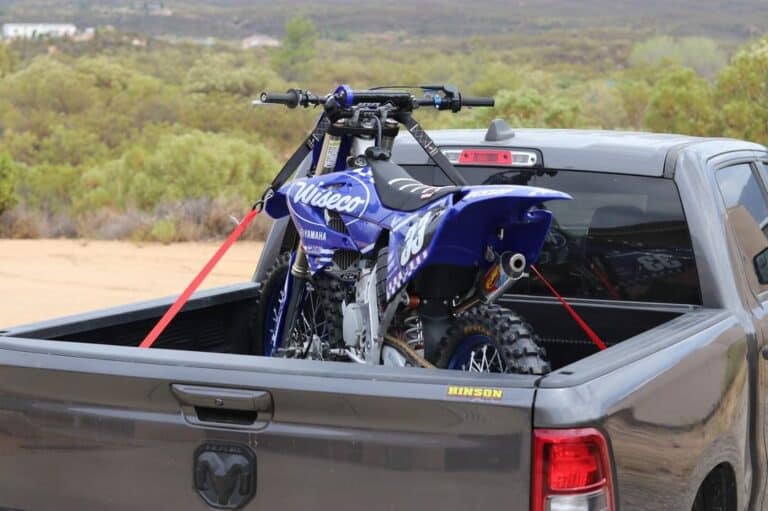
For truck beds:
- Lay your boards flat: stack them if needed, but don’t overdo it.
- Make sure the tail isn’t sticking out too far to avoid damage.
Step 3: Strap it Down with Retractable Ratchet Straps
For Roof Racks:
- Attach the Straps: Hook the ends of the retractable tie-downs to the roof rack’s crossbars.
- Position the Straps: Make sure the straps are positioned about a foot from each end of the surfboards.
- Tighten the Straps: Engage the ratchet mechanism until the strap is tight. Do not overtighten to avoid damaging the boards.
- Double-Check: Make sure the straps are secure and the boards are immobile.
For Truck Beds:
- Anchor Points: Attach the straps to the truck’s built-in anchor points.
- Strap Placement: Position one strap near the tail and another near the nose of the surfboards.
- Tighten Securely: Use the ratchet mechanism to tighten the straps, ensuring a snug fit without over-compression.
- Verify Security: Test the boards by giving them a gentle shake to confirm they are securely fastened.
Step 4: Additional Tips for Surfboard Protection
To further protect your surfboards during transit, consider these additional tips:
- Use a surfboard bag: Shields your board from dings and scratches.
- Add padding: No bag? No problem. A towel or foam between the board and straps works too.
- Check for Sharp Edges: Make sure your ratchet hooks and buckles won’t scratch your board.
- Don’t overload: Stack too many boards, and you’re asking for pressure dings.
How to Tie Down Two Surfboards?
So, you’re doubling up on boards because your buddy Tyler or your bestie Brooke wanna tag along, orrr you just can’t decide which board to ride. Lemme tell you, stacking two surfboards on your roof rack is totally doable. But do it wrong, and you’ll end up with shifting boards, annoying wind noise, or worse, yep we all know it: a mid-drive catastrophe. No worries though! Follow these steps to secure two surfboards safely and stress-free so you can focus on the waves ahead.
Got two kayaks to stack? Here’s the article for ya: How to Tie down a Kayak or Two Kayaks With Retractable Ratchet straps
Step 1: Start with the First Board
- Flip it upside down (deck facing the car, fin facing up) and place it on your roof rack.
- Make sure the nose is facing forward (because we don’t want it catching wind like a parachute).
- If the board has deep concaves or rocker, try to position it so it sits flush with the bars for better stability.
Step 2: Add Some Protection
- Lay a towel or soft padding (like a foam pad or yoga mat) over the first board. This keeps your boards from rubbing against each other and prevents pressure dings or wax smudging all over the bottom of the second board.
Step 3: Stack the Second Board
- Take your second surfboard and flip it upside down (just like the first one, with the fin facing up).
- Place it directly on top of the first board, aligning the noses and tails as much as possible.
- If one board is longer, try centering them so the overhang is even on both sides.
Step 4: Strap ‘Em Down
- Use two tie-down straps: one near the front and one near the back.
- Thread the straps over the top board, loop them under the roof rack’s crossbars, and bring them back over the boards.
- Tighten the straps until they are snug but not crushing the boards (no need to strangle them!!).
Step 5: The Double-Check Shake
- Give the boards a firm shake to make sure they don’t move.
- If you see any shifting, tighten the straps slightly or adjust the positioning.
- Check that the straps aren’t pressing too hard against the rails or fins: a little padding can prevent unwanted dings.
Bonus Tips:
✔ Heaviest Board on the Bottom: If one board is bigger or bulkier, keep it on the bottom for better stability.
✔ Watch the Wax!: Stacking wax-to-wax can get messy and sticky. If possible, place a board bag or towel in between.
✔ No Loose Ends: Tuck away any excess strap material to avoid it flapping in the wind (trust us, that noise is annoying at 60 mph).
✔ Drive Smart: Two boards mean extra wind resistance, so take it easy on high-speed roads and in strong crosswinds.
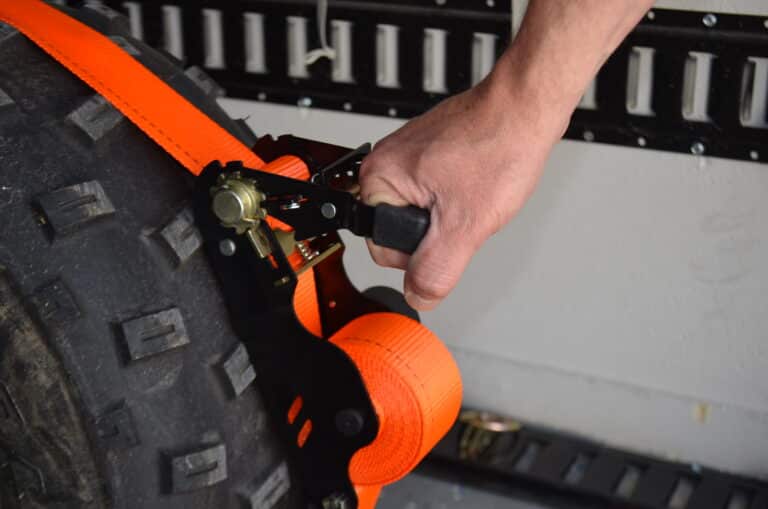
How to Use a Retractable Surfboard Strap?
Let’s be real. Nobody wants to spend more time fiddling with straps than actually surfing. That’s where retractable surfboard straps come in! No tangled mess, no complicated knots. Just a simple, click-and-go system to keep your board locked in tight. Ready to roll? Here’s how to use them like a pro:
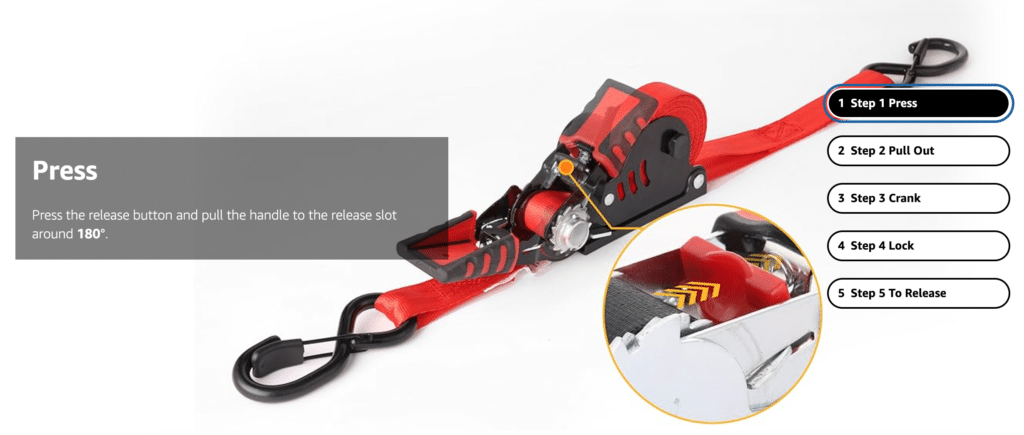
Step 1: Press the release button
First things first: press the magic button! This unlocks the strap so you can pull it out smoothly. At the same time, rotate the handle about 180 degrees for the 1 in x 12 ft straps (or 90 degrees for the 1 in x 10 ft straps) to the release slot. Boom! You’re in business.

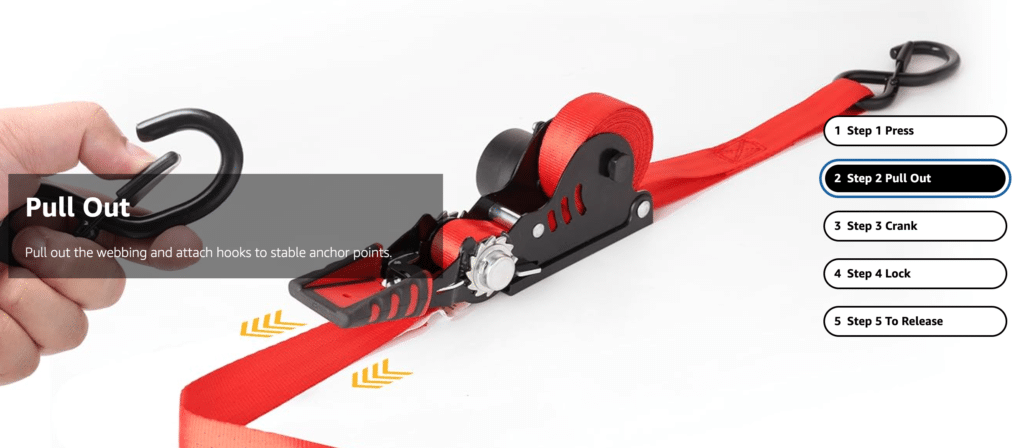
Step 2: Pull out the strap
Now, grab the strap and extend it to the right length. Attach the hook to a secure anchor point like your roof rack’s crossbars, a truck bed anchor, or any sturdy attachment point. Make sure it’s nice and secure cus this is what is holding your board in place!

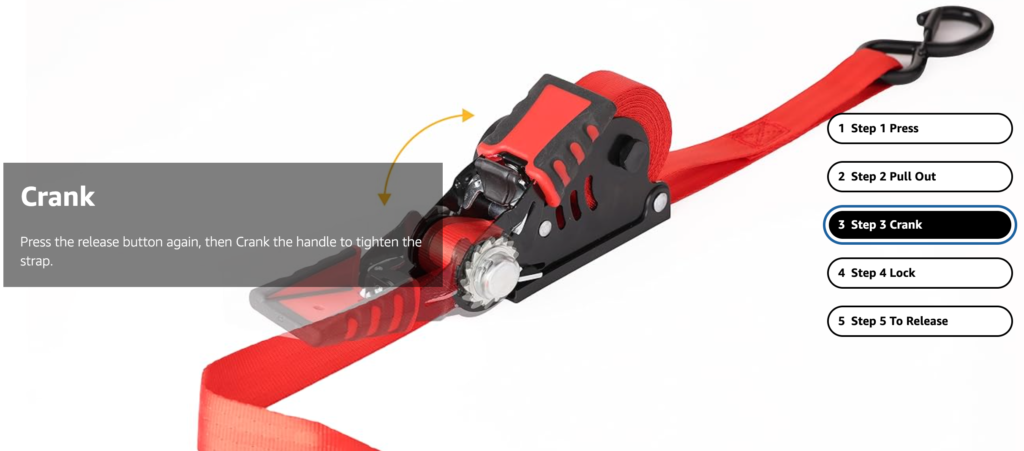
Step 3: Tighten the strap
Time to lock things in! Press the release button again and pump the handle up and down a few times. Each pump cinches the strap tighter, locking your board snugly in place. Tight enough that it won’t budge, but not so tight that you crush your board’s rails. Well you just gotta find that sweet spot!

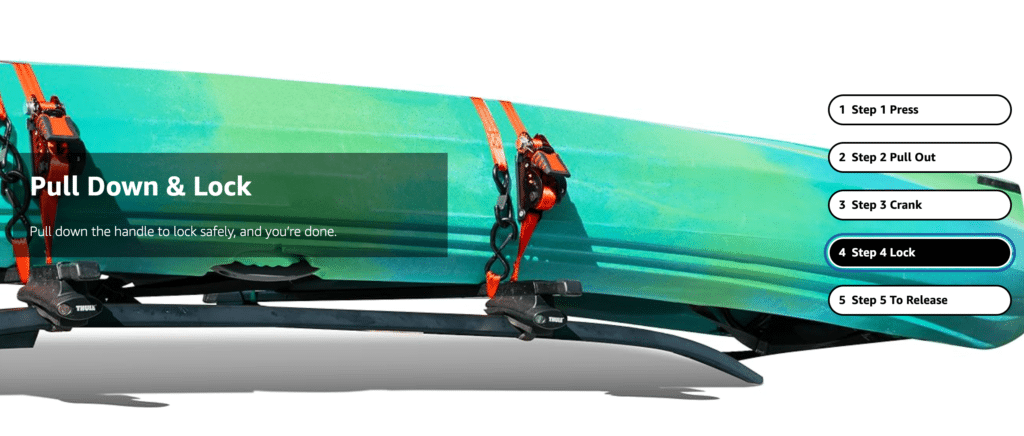
Step 4: Lock the strap
Once you’re happy with the fit, pull the handle down to its locked position. That’s it! Your strap is officially locked, and your board isn’t going anywhere! No flapping, no shifting. Just smooth and secure transport.

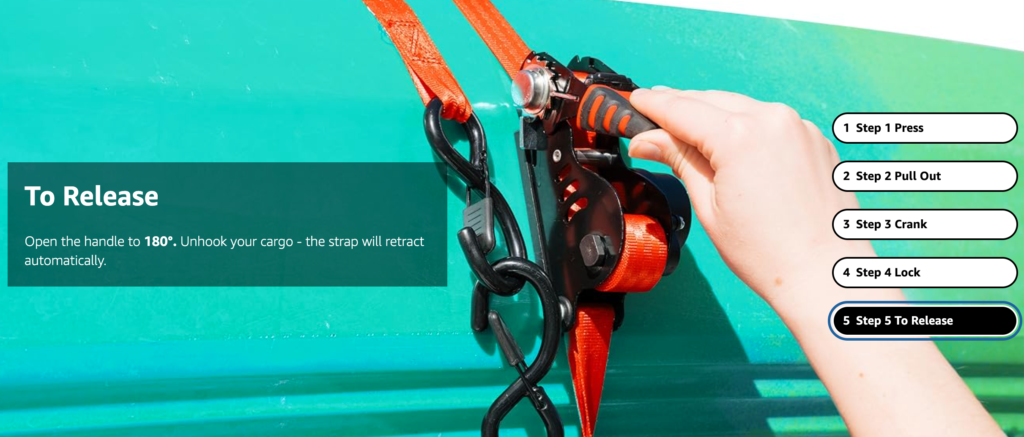
Step 5: Release
When it’s time to unload, simply unhook the strap from the anchor point, rotate the handle back to 180 degrees, and let the retraction magic do its thing. The strap zips back into place automatically, leaving no loose ends and no messy cleanup.

Why You’ll Love Retractable Ratchet Straps?
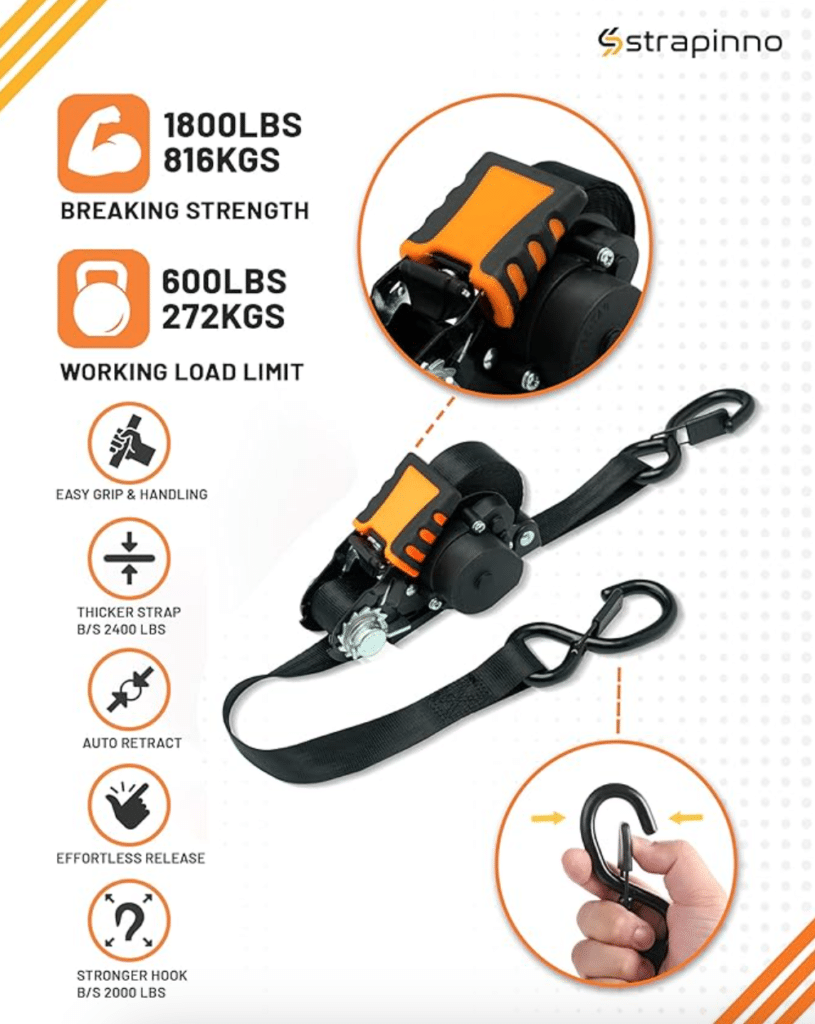
Retractable ratchet straps (a.k.a. retractable tie-down straps) are the ultimate game-changer for surfboard transportation. Unlike those old-school tie-downs that tangle, loosen, or take forever to secure, these bad boys have a built-in retraction mechanism that keeps things tight, tangle-free, and hassle-free. Less time strapping, more time shredding!
✔ Fast & Effortless – No knots, no guesswork. Just strap, tighten, and go!
✔ Tangle-Free Storage – No more messy, knotted straps flying around your trunk.
✔ Secure Hold – Keeps your surfboard rock-solid in place for the whole ride.
✔ Easy Release – Unhook and retract in seconds. Less time packing, more time surfing! (Amazing huh?)
Read more: Ultimate Guide to Retractable Ratchet Straps (2025 Edition)

Common Surfboard Transport Mistakes (That You’ll Now Avoid!)
Transporting your surfboard seems simple, right? Just throw it on the roof, strap it down, and hit the road. Wrong! A few rookie mistakes can turn your road trip into a nightmare. Don’t be that surfer. Avoid these common surfboard transport mistakes and get to the beach hassle-free.
1. Overtightening Straps
Sure, you want your board secure, but there’s a fine line between snug and straight-up board abuse. Cranking your straps down like you’re securing a cargo load? Bad idea.
- What happens? You risk warping your board or crushing the rails especially with a soft-top or epoxy board.
- What to do instead? Tighten until the board is secure, but not compressed. Give it a little shake! It should stay put without being squeezed to death.
💡 Tip: If you’re hearing creaks or cracks while tightening, you’ve gone wayyyy too far. Ease up!
2. Skipping Padding
Those metal buckles and rough straps? Yeah well they are not board-friendly.
- What happens? Over time, straps rubbing against your board can leave scratches, pressure dings, or even cause delamination. Plus, if the buckle slaps against your board while driving, you’re in for a nasty surprise.
- What to do instead? Always use padding where the straps touch the board like a towel, foam pad, or even some pipe insulation will do the trick. If your strap buckle is near the rails, wrap it with a soft cloth to avoid damage.
💡 Tip: A board bag is the ultimate protection especially on long road trips!
3. Ignoring Strap Wear & Tear
You wouldn’t surf with a frayed leash, so why trust a worn-out strap to hold your board at 70 mph? Straps degrade over time due to sun, salt, and constant tension.
- What happens? A weak strap can snap mid-drive, launching your board into traffic (or worse, another car). That’s a bad day for everyone.
- What to do instead? Inspect your straps before every trip. Look for fraying, weak spots, or damaged buckles. If they look sketchy, replace them ASAP.
💡 Tip: If you can’t remember when you bought your straps… it’s probably time for new ones? (Totally not implying anything!)
4. Poor Strap Placement
Where you place your straps makes all the difference. Position them incorrectly, and your board might shift, slide, or (worst case) slip free.
- What happens? If straps are too far apart, the middle of your board catches wind and bounces. If they are too close together, your board won’t be stable.
- What to do instead? Position your straps about a foot from each end of the board. This keeps it locked down while evenly distributing pressure.
💡 Tip: If you are stacking multiple boards, strap them together first before securing them to the rack. This keeps them from shifting independently.
Choose Your Style: Blue, Green, or Black
We know that style matters, even when you are hauling your surfboard to the beach. That’s why our retractable ratchet straps come in three sleek colors other than red: Blue, Green, and Black. Whether you’re looking to match your gear, add a pop of color, or keep it classic, we’ve got you covered. Choose the color that suits your vibe, and hit the road with straps that not only perform flawlessly but look great too!


The Perfect Beach Day Awaits!
With your surfboard safely strapped down, the only thing left to do is hit the road and chase those waves. No stress, no loose boards, just smooth cruising and epic sessions ahead.
So embrace the efficiency, security, and reliability of retractable ratchet straps. Whether you’re a pro surfer or a weekend warrior, locking down your gear the right way means one thing: more time in the water and less time worrying. Here’s to endless surf trips, perfect waves, and zero board mishaps.
Invest in your safe travels this summer. Buy retractable ratchet straps at Strapinno.com today!